How to Design a Website Using Squarespace

Squarespace is a design lover's dream – and if you're looking to quickly build a website in the creative industry, it's essential. Why? Because it offers the largest palette of creative tools around. And best of all, anyone can use it.
In this Squarespace tutorial, we're going to show you how to use Squarespace, with plenty of screenshots and videos to support you along the way. Here are the 11 steps we'll cover:
How to Use Squarespace in 11 Simple Steps
- Get started (for free!)
- Choose a template
- Create a login
- Add/remove pages
- Edit pages
- Adjust design and add branding
- Add site information and configure key settings
- Preview your site
- Choose a price plan
- Integrate marketing tools (optional)
- Add ecommerce features (optional)
![]()
1
Get Started (for Free!)
If you haven't signed up for Squarespace yet, this is your first step.
Squarespace's prices range from
But you don't have to think about that just yet! Squarespace offers a 14-day free trial, so just head to squarespace.com to sign up. You don't need to enter any details for the time being – just click the 'Get Started' button to move on to the next step! Simple.

![]()
Are You Ready to Start Building?
Jump on Squarespace's 14-day free trial to start creating your very own website. No pesky payment details needed!
2
Choose a Template
After you've clicked 'Get Started', you'll be prompted to select a design for your website:

You can browse by industry (everything from 'Online Stores' and 'Restaurants' to 'Weddings' and 'Photography'), or by popular designs.

Hover over a template and select 'Preview' to take it for a spin.
The template you pick will act as your website's design springboard, so it's worth previewing a few to find the one that feels most 'you'.
Good to know: Found the perfect design, but it's missing a page or feature your site needs? Don't worry! Squarespace 7.1 lets you add new pages and elements to your template. Sure, it's a time saver if your template already has everything you need – but this doesn't need to be a deal breaker!
A bit of advice at this stage: Squarespace's designs are nice. In fact, they're really nice – the best we've ever tested! This is obviously great, but can also make it hard to settle on one template – you're really spoiled for choice, and it's easy to get overwhelmed and give up altogether.
But don't do that! Here are our top tips for picking your template:
- Stick to your industry – this is a simple way to narrow down your options, and also make sure you're following industry best practice.
- 'Favorite' your favorite templates by clicking the heart – these will then be saved under the 'My Favorites' category for you to come back to with fresh eyes.
- Just… pick one! – You can customize your template however you like, so don't get too hung up on your decision at this stage.
Once you've chosen your template, hover over it and select the option 'Start with [template name]'. We're going to go with the template Atlantic from the restaurant category.
![]()
Are You Ready to Get Creative?
Squarespace offers a range of stunning templates for you to customize. Browse designs, choose your favorite, and get creating!
3
Create a Login
At this point, you'll need to sign up with an email address, or log in with your Google account:

Next, give your site a name. This will display along the top of your website, although it can be edited.

Squarespace will then show you a few quick slides on editing your site. You can skip through these, confident in the fact that you already have (probably) the best tutorial on the internet as your trusty guide!
This is your main Squarespace menu, and it's from here that you'll carry out all the steps to bring your site to life.

4
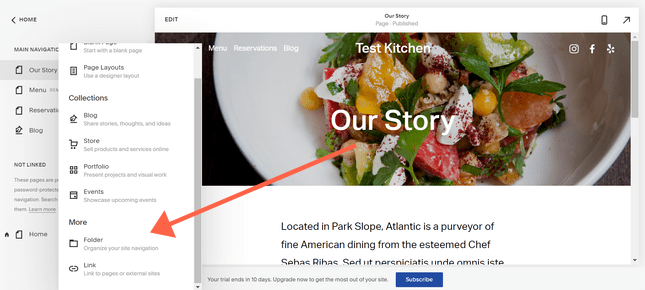
Add/Remove Pages
If you moved into a house that needed a lot of work, you'd make sure the bigger things – bathrooms, kitchens etc. – were in place before you started painting the walls.
The same applies here. Don't get sucked into designing just yet – focus on your site's structure.
Adding Pages
Take a look at the menu. Is there anything missing?
For our restaurant, The Test Kitchen, we want a blog to share some recipes people can copy from their kitchens, updates on our Covid-19 precautions and policies, and dispatches from the team.
Here's how we added a blog to the site:
Go to 'Pages', where you'll see all the current pages on your website:

Click the + and select 'Blog' from the list.

Next, choose your preferred layout:

After you've chosen a layout, click onto any of the four 'dummy' blog posts to sub in your own content, and delete any you don't need for the time being.
Creating a Submenu
Too many pages to fit into your site menu? Pop your pages in a folder to make them easy to navigate.
To group pages together in a submenu, go to Pages, then click again on the cross above the list of pages. From the menu, select 'Folder'.
You can then set the name for this menu, as well as adding pages to sit within it.
Removing Pages
Need to get rid of a page or folder? No problem. Just hover over the page on the menu and a garbage emoji will show up to the left. Click this icon, then 'Confirm'.
![]()
Got the Basics Down?
Squarespace isn't the fastest builder around, but with a little patience you'll soon be building like a pro. Jump in and give it a go!
5
Edit Pages
Once you have the right pages in place, it's time to adjust their content to fit your brand. This means replacing the placeholder copy, rearranging sections, and adding in new ones.
To flip into editor mode, go to the page you want to edit and click 'Edit' in the top left hand corner.
In this case, we're editing the homepage. Squarespace works in 'strips', or 'sections'. To get a feel of how this looks in real life, check out the video below, where we've played around with adding sections and switching out content.
In short, you can edit any section by hovering over it and then clicking on the pen icon. To add another section, hover between two sections and click on the blue '+' icon which appears in the middle.
Here's a selection of the types of sections you can add:

Not a fan of the page order? Simply click and hold to pick up a section, then drag it higher or lower on the page.
Once you're done adding, editing, and moving sections, be sure to click 'Done' in the top left hand corner, then 'Save'.
![]()
Got the Basics Down?
Squarespace isn't the fastest builder around, but with a little patience you'll soon be building like a pro. Jump in and give it a go!
6
Adjust Design and Add Branding
Now the layout of your pages is roughly in place, we're going to tweak your design and add some branding to make your site look more 'you'.
From the main menu, head to 'Design'.

Change Fonts and Colors
Go into the section called 'Fonts' to pick a font 'pack' (essentially a font pairing) to roll out across your site, and also change the set font size. Under 'Global Text Styles', click into any text type (headings, paragraphs etc.) to tweak the weighting and spacing of a font. Then click on 'Assign Styles' (within Fonts) to allocate different fonts to different parts of your site.
Good to know: Quick heads up that Version 7.1 (the most recent version of Squarespace) doesn't support custom Adobe fonts.
In the Colors section, Squarespace has a selection of pre-made color palettes to choose from, or the option to upload a color (by six-character HTML code), or even to upload an image and have Squarespace pull out the key colors from it.
Animations and Styling
Under 'Animations', you can set animations to appear on your site. Animations are when content appears to 'pop' 'fade' or 'fall' into place. It's a great and stylish way to jazz up your site!

Under Spacing and Image Blocks, you can make minor tweaks to the spacing and alignment of your content sections and images. And under Buttons, you can alter the style of your CTAs.
Top tip: In 2020, just over 50% of web traffic worldwide came from mobile devices. Be sure to regularly toggle over to the mobile version of your site to make sure everything works as well on desktop as it does on mobile:

The Finer Details
By this stage, your site is looking pretty good. Content? Check. Images? Check. On-brand colors and fonts? Check. Fun animations? Check.
But a great website should be consistent across all possible touchpoints, and that's why it's crucial to sweat the small stuff:
Design > Browser icon – Also known as a favicon, the browser icon is what will appear next to your site name when your website is in a tab. At the moment, ours is the default black cube – most brands would opt to upload a logo here instead:

Design > 404 page – This is the content that will display if readers try to access a page within your site which doesn't exist. There's some default copy here, but we suggest swapping it out for something more on-brand. Here's our 404 page, for example:

Checkout Page and Product Items
These sections are all about customizing your product pages and checkout pages. No products to sell yet? Skip these for now!
Adding a Logo and Social Logo
You can upload a social logo (i.e. the image that represents your content when shared over social media) under Design > Social Sharing.
To upload a logo to actually feature across your site, go back into Edit mode on the homepage. Hover over the header, and click the 'Edit Site Header button', then 'Site Title and Logo', where you'll see space to upload your logo.
7
Add Site Information and Configure Key Settings
Before we can get on to paying for your site and publishing it, there's a bit of admin to level out first. You'll find a ton of different settings in the Settings section – we've covered the essentials for any website below, but you may find others are relevant for yours!
Language and Business Information
Go to Settings > Language & Region to choose a location, language, and time zone.
Under Settings > Business Information, fill in your contact details, location, and opening hours (if applicable).

Domain Name
Your domain name is your site's address – ours is websitebuilderexpert.com. You have some options when it comes to getting your own domain name:
- Purchase from another domain registrar and transfer to your Squarespace site. Go to Settings > Domains > Use a Domain I Own, and Squarespace will walk you through the steps to adding this.
- Get a domain name through Squarespace. This will cost upwards of $20/year (so slightly more expensive than buying elsewhere, but a bit more convenient). Go to Settings > Domains > Get a domain to find an available one.
- Buy an annual Squarespace plan and get a domain free for the first year. We'll cover plans in the next section, but if you're happy to commit to an annual plan, you'll get a domain name thrown in free for the first year, as well as a saving on the 'core' cost. To claim this, sign up to a paid plan, then go to Settings > Domains > Get a domain.
Social Media
Link your social media accounts by going to Settings > Social Links. Any accounts you add here will be accessible from icons within your header, unless you remove them.
![]()
What Will Your Website Be Called?
You want your domain to be unique, simple, and catchy. Don't wait for someone else to claim your domain – once it's gone, it's gone!
8
Preview Your Site
When you're still within your two week Squarespace trial period, your site will be private by default. That means nobody will be able to access it just by googling your business, for example. Even if you have a domain name configured and send someone a direct link, they'll only see a login page.
But having friends and family see your website is an important step in ironing out any kinks before your site goes live. That's why we recommend setting a sitewide password. Anyone with this password will be able to access the most recent edit of your website. If nothing else, this can be a useful way for you to preview the site 'in real life' across different devices.
How to Set a Sitewide Password
From the home menu, go to Settings > Site Availability. Then, change the default setting from 'Public' to 'Password Protected', and enter your chosen password. Just remember to switch it back to public once you've signed up for a paid plan!
9
Choose a Price Plan

Before your free trial ends, make sure you subscribe to a paid plan. Squarespace has four price plans:
- Personal –
- Business –
- Ecommerce Basic –
- Ecommerce Advanced –
Of course, the plans all differ in the features they provide (the following two steps of this guide are only possible if you have a business plan or above, for example). You can save between 13% and 30% if you sign up for an annual plan.
Remember we also have an exclusive offer code for our readers that will save you 10% on the cost of any Squarespace plan! All you need to do is enter code WBE at the checkout.
But what do they provide? Well, as you would expect, you get more if you pay more. For example, the Personal Plan is perfect for portfolios and blogs, but isn't right for users with business ambitions, because it cannot sell items for you. It also doesn't provide third party integrations like Mailchimp or OpenTable, or promotional pop-ups.
The two ecommerce plans offer zero transaction fees, while Business charges you 3%. So think about your budget and what you'd like your website to be capable of.
We've developed a handy tool to point you in the direction of the right plan for you – just click the 'Start Now' button below to answer a few questions.
Once you've selected a plan and paid for it, your site is now live. For some websites (portfolios etc.), your work may well now be done. For anyone on the Business plan or above, there are a couple more optional steps, which we'll cover below.
![]()
Did You Spot Your Perfect Plan?
Compare prices and features, then save 10% with our exclusive offer code – simply enter WBE at checkout to save!
10
Integrate Marketing Tools (Optional)
Firstly, to add marketing tools, you'll need to be on the 'Business' plan at the very least. How do you upgrade? You won't be surprised to hear that Squarespace have thought of that – there's a strategically placed 'Upgrade Now' button at the foot of every page during your free trial.
Of course, these tools aren't necessary for every website. So if you're not planning to sell online, you can skip Steps 7 and 8.

By clicking 'Marketing' on the main menu, you'll see everything you need for promoting your Squarespace site. See the image below for the marketing options.

From here you can add pop-ups, show social media buttons, integrate your Facebook page, link your Instagram feed, and more, all with just a couple of clicks. You can even create a new email campaign with Squarespace Email Campaigns. For such a creative website builder, Squarespace doesn't skimp on the business side.
You can even see how your site is performing with the 'Analytics' option on the home panel. It lets you view traffic, search for keywords, and essentially keep track of how your Squarespace website is doing.
11
Add Ecommerce Features (Optional)
62% of US consumers now shop online more than they did before the pandemic, so ecommerce may be something you want to add to your site.
Similar to adding marketing tools, you'll need to be on at least the 'Business' price plan to sell stuff. That said, we would still recommend the 'Commerce' plans for more ambitious online stores.
So, once you've upgraded (just hit the blue 'Upgrade Now' button), click 'Commerce' on the home panel, and you can start selling.
You can now integrate these sales features:
- Online orders
- Inventory management
- View your customers
- Add discounts
Note, you'll have to add a 'Products' page before managing your stock. But don't worry, just revisit the 'Adding pages' steps and repeat the process. It's really easy.
Squarespace has an integration with Square, the payments processing giant. This allows you to take card payments offline, as well as online – all you need is the Square Commerce app, one of Square's small card readers ($49), and you're good to go. Check out this video to see more about how this could work for your store:

In terms of fees, offline payments will be subject to Square's own transaction and processing fees. This varies depending on several factors (including location), but in the US you can expect to pay:
- 2.6% transaction fee + $0.10 processing fee for swiped/dipped/tapped transactions
- 3.5% transaction fee + $0.15 processing fee for keyed transactions
Although it's always worth checking this directly on Square's website. You won't incur any extra fees from Squarespace for selling offline, or selling online using its Commerce plans.
![]()
Getting Ready to Sell Online?
You've had your great idea, you might even have products lined up ready to go. Now all you need is a Squarespace store – start today!
Further Reading
Thinking of building an online store but not sure that Squarespace is for you? Compare it against other online store builders in our guide on the Best Ecommerce Platforms.
Are you interested in starting a dropshipping business? Take a look at our step-by-step guide on How to Dropship on Squarespace to get started.
How to Use Squarespace: Recap
Creating a website with Squarespace is more satisfying than most other builders. Why? Because while it needs more care and attention, it's still easy to use.
It may seem like a lot of information to absorb, but the process is really quite simple. To jog your memory, let's recap the eleven simple steps for making a beautiful Squarespace site:
How to Use Squarespace in 11 Simple Steps
- Get started (for free!)
- Choose a template
- Create a login
- Add/remove pages
- Edit pages
- Adjust design and add branding
- Add site information and configure key settings
- Preview your site
- Choose a price plan
- Integrate marketing tools (optional)
- Add ecommerce features (optional)
With Squarespace, you have so much creative flexibility – much more than with most website builders. Sure, it's ideal for users with loads of design flair, but it's also easy enough for anyone to create a professional quality website.
So get started with Squarespace today, and see where the creative journey takes you.
![]()
Are you Excited to Get Started?
We've shown you how, now all that's left is for you to grab Squarespace by its free trial and create your dream website.
FAQs
Yes! Squarespace has a 14-day free trial for you to use, so you can try it without committing to a paid plan straight away. All you need is an email and password to get started – no payment details are needed until you actually want to sign up to a plan.
No! Squarespace hosts your website for you, and the cost of hosting is included in your price plan. This means you don't need to find, sign up, or pay for web hosting separately. In fact, you can't sort out your own hosting, even if you wanted to. Instead, you just begin building, without any technical hassle.
Yes! Although you can buy your domain directly from Squarespace, you can also use a domain you already own. For example, you can keep a domain purchased from GoDaddy and point it to your new Squarespace website. Go to Settings > Domains > Use a Domain I Own to start this process.
How to Design a Website Using Squarespace
Source: https://www.websitebuilderexpert.com/website-builders/how-to-use-squarespace/
0 Response to "How to Design a Website Using Squarespace"
Enregistrer un commentaire